Wargaming the English Civil War, American War of Independence and Sudanese campaigns in 28mm

Tuesday 22 June 2010

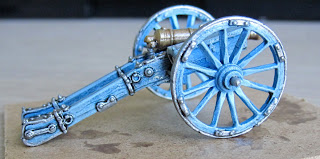
British 6pdr WIP (3)


I wasn't happy with how the cannon looked as I mentioned in my post yesterday and have decided to add a coat of Army Painter's 'Dark Tone'. This was in response to AD's comment on the last post, informing me the metal should be very dark (almost black). I have to admit, I went off a mixture of sources for the painting style, primarily from the way other bloggers have painted similar models or those models on the Perry site which seem to vary from a very bright silver to almost black (or silver with 'black lining').

I think it looks quite good after being 'dipped'. I used a brush to paint the dip onto the metal areas and removed any that settled on the lighter wooden areas. This was to darken the silver and add a black line around the outside of it. It will be varnished again once the model has dried (around 24 hours after application). I think it looks quite good like it is now (I couldn't bare another re-paint!) and will look even better once based and the crew have been added.

Once again, please leave your thoughts and feelings as a comment on this post as they are invaluable to the project, other gamers and myself.

Monday 21 June 2010

British 6pdr WIP (2)


Here's the completed British 6pdr. It's been painted and varnished, no dip this time on the advice of Giles Allison. I'm fairly pleased with it but I have to say, the metal seems a little too light (not sure whether the dip would have made it darker and shaded it).

What do you think? Do you think I should leave it like it is or try and dip it to shade down the very light coloured metal (not sure if the latter will work though)?

It might look better once it's been based and the crew added but I'm not entirely happy.

Visitor Numbers Rocket!

In the last week, I've had an additional 9 'followers' for the blog (an increase of almost 100%) and I wanted to find out why. I use Stat Counter to monitor traffic coming to each of my three blogs and I logged on to check my viewing figures and this is what I found:


As you can see, from an average of about 15 unique visitors a day, I received almost 200 in one day! With Stat Counter, you can see what users typed in to Google to get to your site, or from what web URL their arrived at your site from. I followed one URL which cropped up many times and I followed it back to a link on the TMP message boards where a user (Tango01) had linked to my blog in one of his posts and I'd like to thank him for doing so!

Feel free to link to my posts or blog directly if you like my work and want to share it with others, such as other users on TMP for instance - I'm more than happy for you to do that!

Saturday 19 June 2010

Barrels and Sacks

Just finished a couple of Hovels barrels and have started work on a couple of other scenic pieces. These were filed and then washed in soapy water with a tooth brush before undercoating with black spray paint. Once dry, these get several layers of dry-brushing until they look realistic enough for the gaming table!


From the photo above, you will notice that two of the barrels have the same colours whereas the third (right) has been dry-brushed with another, slightly lighter, tone for variation. I'm very pleased with these, my first resin scenic pieces, as I think they look very realistic and wouldn't look out of place on a professionally made gaming board.


Here's a shot of a couple of other items also from Hovels that I'm painting up. It's quite difficult dry-brushing so I've mounted them on lots of different items so I don't have to actually hold the crates and sacks etc whilst I'm painting them. Some of these items include a glue stick, wine bottle top, pencil and spray paint tops!

After these come the AWI farm house and barn that I also purchased from Hovels.

If you have any advice or questions, please leave a comment. If you like what you see here and would like to be notified of future posts, please 'follow' my blog.

Wednesday 16 June 2010

Reinforcements have arrived!

Whilst I'm waiting on paint to dry I thought I'd do a little update. I came home to find this on the door mat and knew that my reinforcements had arrived!


Once again, VERY quick service from Perry (ordered on Monday, arrived on Wednesday) and all in very appropriate packaging. So, here's what arrived in the post:


This now completes the purchase of my British and Hessian army with the addition of some Jaegers, Musketeers and some separate command figures to make a brigadier stand for the Hessian brigade. You may also notice some American riflemen in the top left of the photo. These will form the beginnings of my American army. I'm just waiting on some paint before I can make a start on any of these but I'm got plenty to be getting on with including the British and some of the hovels models I recently received and some terrain for the battlefield.

Friday 11 June 2010

The Pledge

I've got to be realistic with what I can physically paint and by when so I've set myself a few targets. Firstly, I estimate the Bunker Hill project to take me two years in all to complete, figures for both British and American forces and a high quality terrain board to go with it. In the shorter term, I aim to put on a game at Christmas with my Dad, cousins and uncle who're coming to spend it with us. In order to complete this ,I aim to create a smaller force of perhaps a Brigade or two for each side with which to put on a smaller skirmish scenario, inspired by some of the scenarios in the British Grenadier books. And it is here that I'm going to commit myself and make 'The Pledge' and detail what I going to paint any by when.

British Grenadiers assault Bunker Hill (Breeds Hill)

My first goals are to complete a small British force comprising of both British and Hessians. Below is a plan of what I aim to finish by the end of August/September.

British:
- Brigadier/CinC
- Unit of 20 musketeers
- Unit of 16 Grenadiers
- One model 6pdr w/ crew

Hessians:
- Unit of 18 musketeers
- Unit of 8 Jaegers

I think this is a reasonable target, given the amount of time I have and I would like to add an additional unit of British musketeers and a brigadier for the Hessian contingent but I'll have to see how it goes. Wish me luck!

Thursday 10 June 2010

British 6pdr WIP (1)

Here's a shot of my British 6pdr I'm working on. It's not quite finished yet but I've dry brushed the chassis and gun barrel (I'll need to do this again as I've got a bit of blue on it) and just have the metal left to do. I'm also debating whether or not to use the Army Painter dip to add a bit of shading to it. As I've found in the past, dry-brushing does still show up after the AP is applied so I may give it a go. It will hopefully add a bit of depth and realism to the model. What do you think? If you have any suggestions or recommendations please leave a comment at the foot of this post.


Below are two of the three part-completed crew. I've painted the flesh, coats and dry-brushed their ropes (I may make these slightly lighter in colour depending on the feedback I get). I'm a little worried about whether or not the blue of the coats is right. It seems a little too blue, as in the primary colour blue. Should look OK if I dip it with the dark tone and make it a little darker.


I'm hoping to have this painted and based by the weekend. That reminds me, I still need to order some more paint to paint the base with and get some more scatter material!

Please let me know what you think and leave any comments or suggestions below.

Friday 4 June 2010

Tough Northerner


Here's a picture of one of the 'workers militia' I varnished this morning from Musketeer Miniatures. He could be used in Very British Civil War games and other engagements during the 1930s and 40s. This is part of one of my many other projects but this one is currently on an indefinite hiatus.

I thought you might like to see it as he's got a gun! Also because he was painted using the Army Painter 'dip' technique. This one however wasn't highlighted after the dip, just varnished.

Expect an AWI update on either Sunday or Monday.

Tuesday 1 June 2010

Clinton's Brigade at Bunker Hill and Partizan!

Here's a quick update of what I've been working on this weekend. I've been filing and trimming and I can hardly make out my own finger prints anymore! I've tried to be as systematic as possible when it comes to this project and so am working on a single brigade at a time. Hopefully these smaller targets will make the larger one not seem so daunting! First up - Clinton's Brigade.


This is a shot of how I'd like to base the brigade commander, Clinton. This is one of the standard infantry bases. I want to mount him like this because, if you assault fixed positions in 'British Grenadier', you need your Brigadier to be attached to your unit in order to rally off 'disruption points' or else your unit will run!


This is how he will look at the end of the 2nd Marines. Seamlessly blending in at the end of the line and looking rather good wouldn't you agree? Brigadiers are meant to be based singly, but I always like to add a little drama to a base (the guy at the front of the base is almost saying "What took you so long, sir?" and Clinton is replying "Well, I'm bloody well here now aren't I. Let's just get on with it").


This photo shows Clinton's Brigade; Clinton himself on the left, then the 63rd and then the 2nd Marines. Each unit contains 20 miniatures.

I aim to paint four figures in an evening, meaning I can complete a unit in a week (allowing for basing at the weekends) but we'll see how long that lasts!

In other news, it was Partizan at Kelham Hall in Newark on Sunday (arguably one of the best wargames shows out there). I picked up a tin of the 'dark tone' Army Painter as Secundus (Iron Mitten) recommends it for highlighting the red coats of the British so I can now get underway with my ambitious project! I have also purchased some tree stumps for use on bases as scenic pieces from the very friendly people at Redoubt Enterprises.

I took my camera to the show but stupidly forgot to take any photos (there were some great games there!). I also forgot to pick up a few packs of command figures and other bits and bobs from the Perrys. D'oh! I did however meet Paul Darnell of Touching History fame who was a lovely chap and gave me lots of hints and tips for when I come to making the terrain boards for the project. I also wanted to meet Steve Jones of paintingshed as he'd sent me a very helpful email the week before, giving me step by step instructions of how he made his terrain boards. Unfortunately, Sunday lunch was waiting and I had to rush off. Sorry Steve!